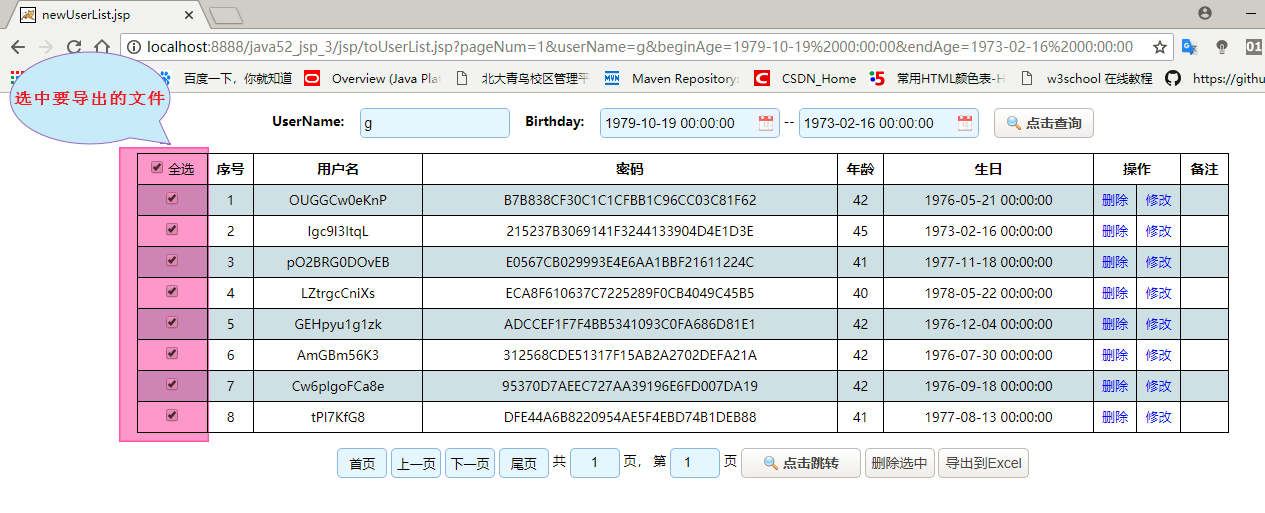
1、选中要导出的文件列表

2、把文件列表对应的记录id保存到数组中
<button class="checkOutxls easyui-linkbutton">导出到Excel</button>
//导出excel表格
$(".checkOutxls").click(function(){
var arr = [];
var sl = $(".sl");
$.each(sl, function(index) {
if(this.checked){
arr.push($(this).val());
}
});
if(arr.length==0){
alert("你还没有选择任何信息!");
}else{
location= "jsp/generateExcel.jsp?arr="+arr;
}
});
3、把数组提交给产生Excel的jsp页面,查询所有的记录封装成对象存放到集合中
<%
//1、获得id数组
String arr = request.getParameter("arr");
//2、存放用户的集合
List<User> list = new ArrayList<User>();
//3、创建用户业务类
UserService userService = new UserServiceImpl();
//4、分解arr数组,通过id获得对象
if (arr != null && !arr.equals("")) {
String[] ids = arr.split(",");
for (int i = 0; i < ids.length; i++) {
//5、存放对象到集合中
list.add(userService.getUserById(Integer.parseInt(ids[i])));
}
}
%>
4、使用POI技术创建一个工作簿、工作页、及对应对象字段的列,对存放对象的集合进行遍历,
把所有的对象属性值写到excel工作薄中,通过IO流操作保存工作薄
// 把list中的user对象读出来,写到excel中
public static int creatUserExcel(List<User> list, String path) {
// 1、指定目标文件
File target = new File(path);
OutputStream out = null;
XSSFWorkbook book = null;
try {
out = new FileOutputStream(target);
// 2、创建工作簿
book = new XSSFWorkbook();
// 3、创建工作簿中的页,指定页的名称
XSSFSheet sheet = book.createSheet("userInfo");
// 4、创建行
int rowNum = 0;
XSSFRow row = sheet.createRow(rowNum++);
// 5、创第一行的单元格并设置值
int coulumNum = 0;
row.createCell(coulumNum++).setCellValue("序号");
row.createCell(coulumNum++).setCellValue("用户名");
row.createCell(coulumNum++).setCellValue("密码");
row.createCell(coulumNum++).setCellValue("年龄");
row.createCell(coulumNum++).setCellValue("生日");
row.createCell(coulumNum++).setCellValue("备注");
// 6、循环输出user对象
for (int i = 0; i < list.size(); i++) {
User st = list.get(i);
coulumNum = 0;
row = sheet.createRow(rowNum++);
row.createCell(coulumNum++).setCellValue(st.getId());
row.createCell(coulumNum++).setCellValue(st.getUserName());
row.createCell(coulumNum++).setCellValue(st.getPassWord());
row.createCell(coulumNum++).setCellValue(st.getAge());
row.createCell(coulumNum++).setCellValue(DateUtil.convertUtilDateToString(st.getBirthday()));
row.createCell(coulumNum++).setCellValue("");
}
// 7、保存文件
book.write(out);
System.out.println("创建表成功");
return 1;
} catch (Exception e) {
e.printStackTrace();
} finally {
// 8、关闭流
if (book != null) {
try {
book.close();
} catch (Exception e) {
}
}
}
return 0;
}
5、指定工作簿在项目中的位置路径
<%
//6、获得文件夹file的路径
String file = application.getRealPath("file");
String fileName = Commons.getFileName("user.xlsx");
String filePath = file + "\\" + fileName;
//7、把对象放到指定的excel中
userService.creatUserExcel(list, filePath);
%>
<%
//8、执行下载功能
File origin = new File(filePath);
InputStream is = null;
out.clear();
OutputStream ot = null;
try {
is = new FileInputStream(origin);
// 9、 设置响应头,控制浏览器下载该文件
response.setHeader("content-disposition", "attachment;filename=" + URLEncoder.encode(fileName, "UTF-8"));
// 10、设置文件ContentType类型,这样设置,会自动判断下载文件类型
response.setContentType("multipart/form-data");
// 11、 获得输出输出流
ot = response.getOutputStream();
byte[] bt = new byte[1024];
int len;
while ((len = is.read(bt)) != -1) {
ot.write(bt, 0, len);
}
ot.flush();
} catch (Exception e) {
e.printStackTrace();
}finally {
try {
if (ot != null) {
ot.close();
}
if (is != null) {
is.close();
}
} catch (Exception e) {
e.printStackTrace();
}
}
%>
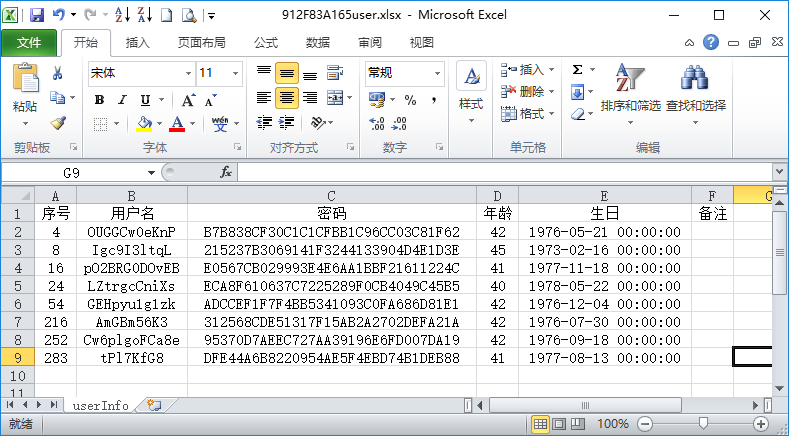
7、完成导出excel表格


